
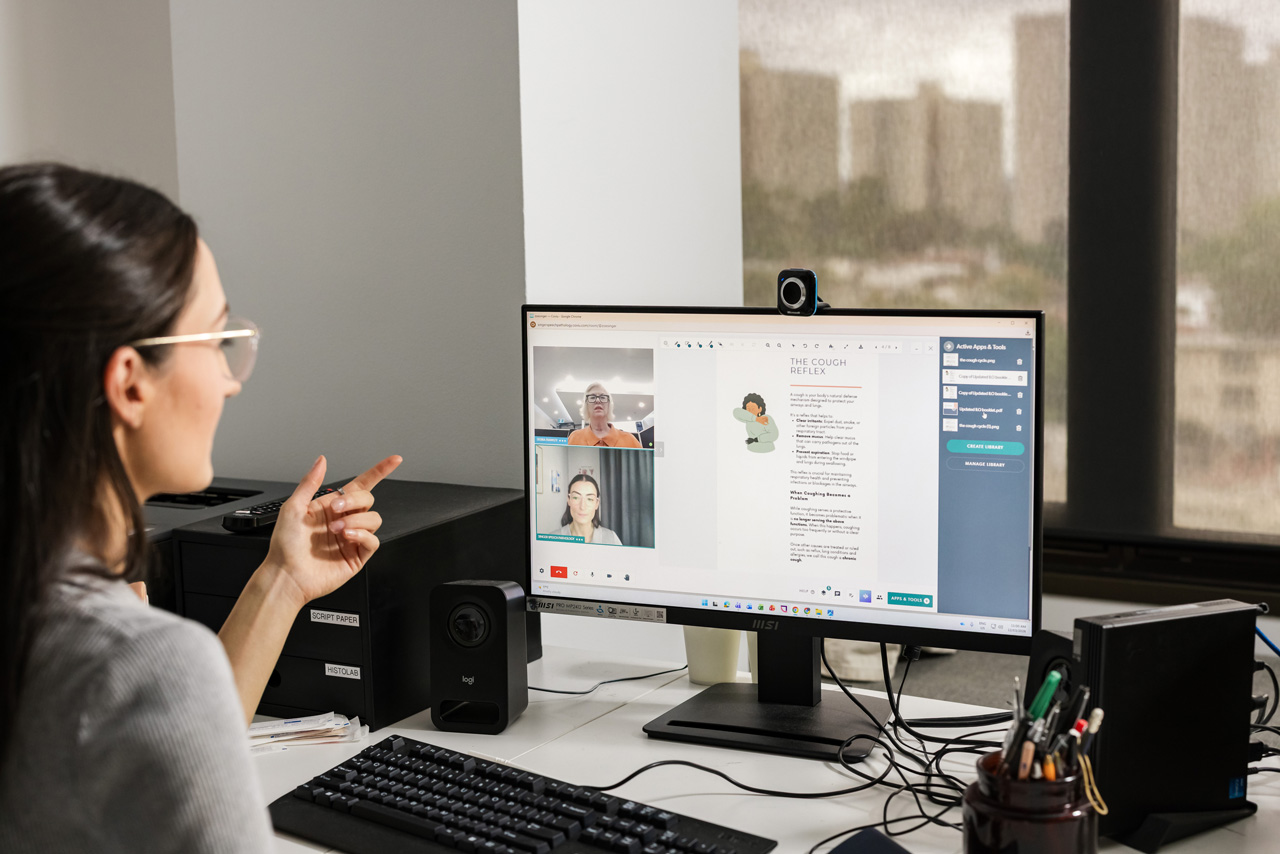
WordPress Plugin for Cliniko
The Ultimate WordPress Plugin for your Cliniko Account
Enhance your online booking system and bring out its full marketing potential with the WordPress Plugin Cliniko by Newcastle Creative Co.! Check out the video run through of what you get.
WordPress Plugin for Cliniko Features
Perfect for practices that want to add a personal touch. Because your form will be ‘native’ to your website, this will provide a superior user experience, especially on mobile. No more iFrames! Also our custom thank you pages give endless opportunities to add that personal touch to your client experience. Depending on how you want to set it up, you will save time in admin resources and make your new client feel at home instantly.
Make your Cliniko forms look like your brand! Just like Cliniko, you can filter out your forms for specific practitioners & locations. And by hosting your forms on your own website, they’ll automatically pick up on your website’s theme & colours. No more embeds, no more developers & coding and no more iFrames. This helps create a superior mobile experience. No more issues scrolling within iFrames!
Stop wasting money on fake conversions. Previously, the only way you could track your advertising efforts was through an unstable method that only records general metrics. With the Cliniko WordPress Plugin you can now track every single click, every single action and every single view a visitor makes on your website, from entry to booking confirmation.
Instead of using messy coding and embeds, this plugin uses the best practices that are approved & compatible with Google’s best practices. That means there’s no chance of breakage when Google performs an update.
Before/After of the Booking Page:
Requirements
- WordPress: 6.7.2
- PHP: 8.0
- License: NewcastleCreativeCo
Installation
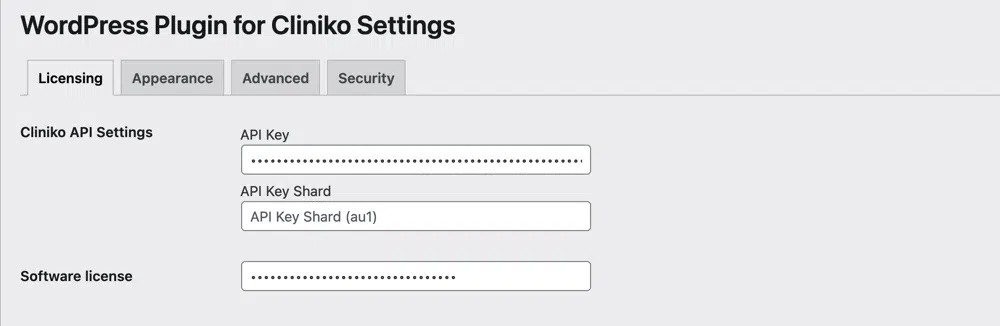
Install the plugin from the downloaded cliniko-for-wordpress.zip archive. Before starting the configuration process, create an API key.
API Key
The API Key is used to communicate with Cliniko, please follow the next steps to obtain one:
- Log in to your Cliniko account
- Go to My Info > API Key
- Generate a new API Key
- Copy the generated API Key to your clipboard
- Paste the copied API Key to Cliniko Settings > Licensing > API Key
API Key Shard
The shard is appended to the end of the API Key e.g. MS0xLWl4SzYYYYdtR3V2HNOTAREALKEYwvNHdeW0pd-au2 the shard is au2. If your API Key was generated some time ago and has no shard on it, your shard will be au1.
- Copy the Shard
- Paste to Cliniko Settings > Licensing > API Key Shard
Setup Pages
Before customising settings we recommend creating the pages that will relate to the plugin.
- My Account (where the
[cliniko-account]shortcode will live and where user will login. - Booking Page (where the
[cliniko-booking-form]shortcode will live, if it doesn’t exist already). - Confirmation Page (optional) – we normally place it as a child under book-online/confirmation.
- If you run Classes or Groups you could choose to have a separate /book-a-class page and custom /book-a-class/confirmation page for example. The options are endless!
Setup Cliniko Settings
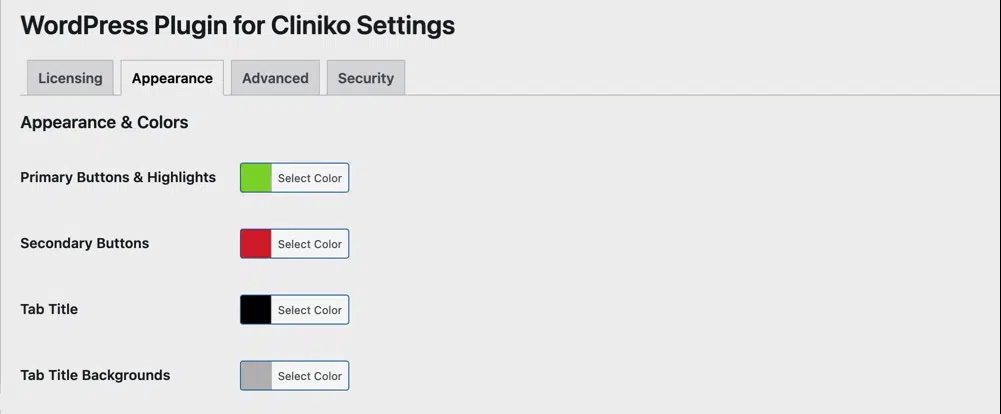
- Navigate to Cliniko Settings > Appearance and set colors to make all elements visible
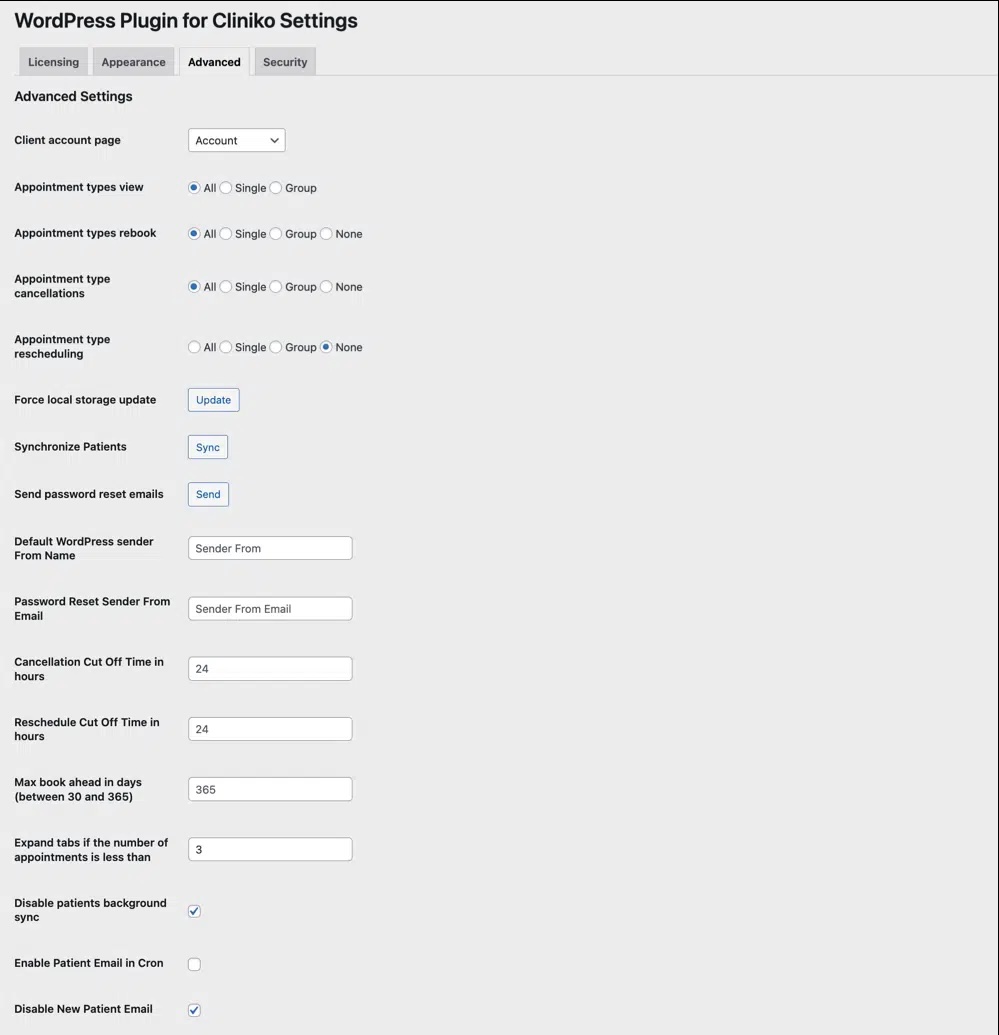
- Navigate to Cliniko Settings > Advanced
- Set the page where the My Account will live along with the rest of the custom settings on how you would like your appointment types and bookings to be handled.
- IMPORTANT SYNC INFO: We recommend syncing just before switching the booking embeds with the shortcode/WPBakery Element and changing the forms on the front end. This will help reduce any double up accounts & reduce the need for merging later on.
Appearance
- “Primary Buttons” – used in buttons, and to highlight some interface elements
- “Secondary Buttons” – used in secondary buttons
- “Tab Title” – used in account page tabs
- “Tab Title Backgrounds” – used in account page tabs
Advanced
- “Client account page” – select account page created at installation step
- “Appointment types view” – select which types of appointments do you want to be visible to visitors
- “Appointment types rebook” – select which appointment types are robookable
- “Appointment type cancellations” – select which appointment types are cancellable
- “Appointment type rescheduling” – select which types of appointments are reschedulable
- “Force local storage update” – click Update button to sync with Cliniko server
- “Synchronize Patients” – click “Sync” to use all patients to create WordPress users, please use AFTER local storage update
- “CSV file with client IDs to be archived” – this option archives Cliniko patients on Cliniko side, use with caution
- “Send password reset emails” – click “Send” to sent password reset emails to all users that are Cliniko patients
- “Default WordPress sender From Name” – set a desirable name that used in plugin emails
- “Password Reset Sender From Email” – set a desirable email that used in plugin emails
- “Cancellation Cut Off Time in hours” – set maximum cut off time for appointment cancellations
- “Reschedule Cut Off Time in hours” – set maximum cut off time for appointment rescheduling
- “Max book ahead in days (between 30 and 365)” – set how far your appointments will be visible in calendar
- “Expand tabs if the number of appointments is less than” – useful when you don’t have lots of appointment types to reveal them right away
- “Disable patients background sync” – we recommend enabling this option if you’re only trying things or when it’s an initial setup. Otherwise, patients will be synced automatically once a day and patients will receive emails that their accounts created on your website.
- “Enable Patient Email in Cron” – check this box if you don’t want to notify clients that their account were created, only works for background syncs
- “Disable New Patient Email” – disables new patient email notification for both manual and auto syncs
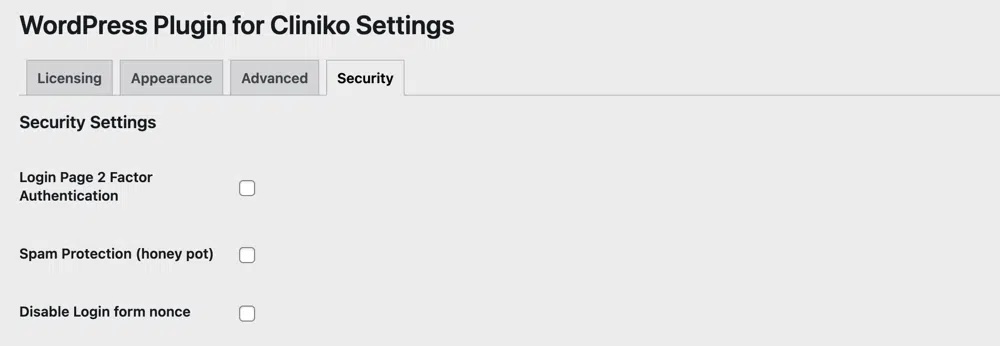
Security
- “Login Page 2 Factor Authentication” – enable email 2 factor auth
- “Spam Protection (honey pot)” – might reduce spam account creation
- “Disable Login form nonce” – might be helpful on some hostings that doesn’t work properly with login form nonce
FAQs
While Joel & the team at Cliniko are aware of the Plugin and are happy for WordPress users to integrate it, we have used our own killer coding skills along with Cliniko’s API to create the plugin all while adhering to strict privacy and security protocols. No patient appointment data is stored on your website. It is only available from within Cliniko. The only data stored on the site is the patients Name, Email & Username. The patient also sets their own passwords.
100% yes. We have made it so you can ‘mix and match’ a practitioner with any appointment type. All without the need for those crazy appointment_type_id[]=xxxxxx fiddly codes.
You can also associate any custom ‘confirmation page’ to any individual form. E.g. a team members specific form could forward to a confirmation page that includes a personalised welcome video from that prac.
All the while fully tracking that conversion.
Currently, this is achieved through WP Bakery. We are looking at Gutenberg blocks and Elementor options if there is a demand for this feature.
IMPORTANT: At this stage Cliniko have not updated their API to ‘sync’ with their built-in Stripe payment system. The PRO plugin will allow you to take payment, however the ‘hook’ isn’t talking to Cliniko to show that the appointment has been paid for. We are waiting on Cliniko Dev team to update the API.
If you’re going to use this plugin, we recommend not using pay at time of booking in your Cliniko account until Cliniko update their API. We are unsure of when this will happen, but a ticket is open.
We are hoping in the future to open this feature right up to allow for subscription/membership payments and other gateways such as Apple Pay.
100% yes. We recommend doing this as one of the first steps to ensure no ‘double up’ accounts are created that will later need merging. You can sync right away and then send the password reset email separately once the new forms and My Account area are all setup.
100% yes. We have made it so you can allow customers to cancel any appointment type, just groups or just standard appointments.
100% yes. If you want to reduce the short notice cancellation rate, you can set a cut off time. For example 6 hours before an appointment and the Cancel button will not appear. They will be able to reschedule though!
100% yes. We have made it super easy, quick and convenient for users to reschedule their existing appointment. Simply hit the reschedule button on the Upcoming Appointments page, a pop will open with everything pre-filled, simply select the new date, the old appointment will be cancelled and the new appointment will appear in the Upcoming Appointments tab.
100% yes. We have made it so if a parent has created their account with the clinic under the same email, then an option will appear in the My Details and Login screen to select which patient the client would like to manage.
If you find that you have 2 or more patients in Cliniko that need to be merged, the patient will need to login using the primary email you merged to. You will also need to delete their old profile from the website manually to ensure they do not login and re-book, creating a new account hat will need to be re-merged.
100% yes. We have made a field to input your business name.
No, you will not need to re-enter the ID. Because the plugin is native to your website and you have Google Tag Manager set up, then you can simply attach ‘tags’ to whichever element of the form you like.
Make sure that you set up colors at Cliniko Settings > Appearance.
The data comes from the Cliniko and populated by Cliniko patients associated with your email.
Usually settings change once a day but you can sync them manually at any time at Cliniko Settings > Advanced > Force local storage update.
Please make sure that you added the entire license key to the field without extra spaces or any other symbols.
Set redirect page as a shortcode attribute:
[cliniko-booking-form confirmation_page="https://yourwebsite.com/confirmation-page"]
Set your email under Cliniko Settings > Advanced > Password Reset Sender From Email
The plugin trigger corresponding events with self explaining names:
- clinikoAppointmentBooked
- clinikoAppointmentReBooked
- clinikoAppointmentReScheduled
- clinikoAppointmentCancelled
So you can track any of these events in GA or any other tracking system.
This error appears if you’re logged in as an administrator role or your email isn’t associated with Cliniko patients. Try viewing the form either in incognito, logged out or logged in as a client profile that exists in cliniko itself to view my account area and forms.
Navigate to account page (that has [cliniko-account] shortcode), click Account Details tab, select the desired patient from the “Cliniko Patient” dropdown and hit Save Changes.
Unfortunately, Cliniko doesn’t allow to add this icon from outside so it’s only their embed feature.
Yes, you can easily sync your patients at Cliniko Settings > Advanced > Synchronize Patients. Please note that it will trigger an email to each of these customers. If you don’t want patients to be emailed, check the “Disable New Patient Email” box at the same settings page.
Currently, the plugin only supports WP Page Builder out of the box. But you can use it as a shortcode in any builder. There are two shortcodes, described in Plugin Setup section.
Navigate to Cliniko Settings > Advanced and check the “Disable New Patient Email” box, also make sure that “Enable Patient Email in Cron” box is unchecked.
CHOOSE YOUR LICENSE
Whether you are after a simple ‘My Account’ with the Basic version. Or you want to supercharge your site with the PRO (coming soon) version which includes a WooCommerce & LearnDash Courses integration, we have the solution for you.
- 1 License
- 1 Synced Cliniko Account
- Custom My Account Dashboard
- 1 Year Support & Updates While Activated
- 1 License
- Syncs with Cliniko Stock
- 1 Synced Cliniko Account
- Custom Payment Gateways
- Integrates with WooCommerce
- Custom My Account Dashboard
- Subscriptions Payments Enabled
- 1 Year Support & Updates While Activated